Rainbow Glitter Pumpkins: Add Neon Sparkle to Your Home Decor
Forget everything you thought you knew about traditional fall and Halloween decorations. While the classic oranges, blacks, and whites have their charm, sometimes you just need a burst of unexpected joy and color. Enter the enchanting world of DIY rainbow glitter pumpkins! This incredibly fun and surprisingly easy craft allows you to infuse your home with vibrant, neon sparkle that breaks away from the conventional, transforming your autumn aesthetic into a dazzling display of personality and light.
Whether you're looking for a quick, engaging activity for preschoolers and kids, or a budget-friendly project to brighten up your own space, these glittery gourds are the perfect solution. Imagine your mantelpiece, office desk, or even a classroom adorned with pumpkins that shimmer in every color of the rainbow. Ready to ditch the drab and embrace the fab?
Why Go Neon? Breaking the Traditional Mold of Fall Decor
Fall decor is often associated with earthy tones, cozy textures, and a certain rustic charm. And while we adore a good autumnal palette, there's an undeniable appeal in shaking things up! Traditional Halloween hues of orange, black, and white can sometimes feel limiting. Why not introduce a spectrum of eye-catching neon colors that pop and sparkle? Our DIY rainbow glitter pumpkins offer a refreshing twist, injecting playful energy and a modern edge into your seasonal arrangements.
Embracing neon means you're not just decorating; you're making a statement. These dazzling pumpkins instantly become conversation starters, eliciting compliments and smiles from everyone who sees them. They're not just for Halloween night, either; their vibrant glow can extend through the entire fall season, offering a cheerful counterpoint to cooler weather and earlier sunsets. Plus, for those who love to get a head start on holiday decorating, these sparkling beauties can easily transition from late August right up until your Christmas decor takes center stage. It's an opportunity to let your creativity shine and prove that fall can be just as bright and bold as any other season.
Gather Your Sparkle: Essential Materials for DIY Rainbow Glitter Pumpkins
One of the best aspects of this craft is its simplicity and affordability. You likely already have many of the supplies tucked away in your "overflowing craft cabinet." For those new to DIY, a quick trip to a local craft store or even a dollar store will set you up without breaking the bank. Here's what you'll need to create your own collection of DIY rainbow glitter pumpkins:
- Pumpkins:
- Munchkin or Mini Real Pumpkins: Readily available at farmers' markets, grocery stores, or local pumpkin patches in the fall. They offer a natural charm but are temporary.
- Faux Pumpkins: Craft stores, dollar stores, and online retailers offer a wide variety of foam, plastic, or papier-mâché pumpkins. These are reusable year after year, making them a sustainable and long-lasting choice. Consider removing their plastic stems if they come off easily for a cleaner glitter application.
- Glitter: The star of the show!
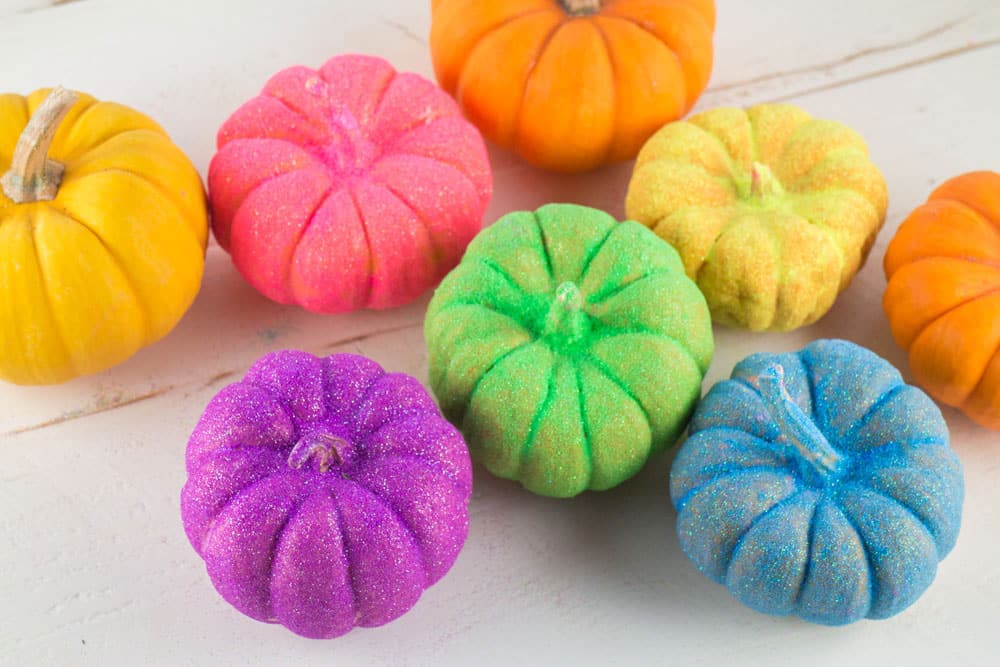
- Neon Glitter: Choose an assortment of vibrant, fluorescent colors (pink, blue, green, yellow, orange, purple) to achieve that true rainbow effect.
- Fine vs. Chunky: Fine glitter provides a smooth, uniform sparkle, while chunky glitter offers more texture and reflective depth. A mix can be visually stunning!
- Adhesive:
- Mod Podge (Matte or Glossy): A popular choice for its strong hold and ease of use. It dries clear, ensuring your glitter's true color shines through.
- Acrylic Paint: If you plan to paint your pumpkins a base color, you can often apply glitter directly onto the wet paint, which acts as its own adhesive. This method is especially popular with kids, as it combines two steps into one glorious mess!
- Spray Adhesive: For a quick application, a light spray adhesive can work, but Mod Podge often offers better control and durability.
- Applicators:
- Paint Brushes or Foam Sponges: For applying Mod Podge or paint.
- Paper Towels: Useful for spreading Mod Podge thinly and for general clean-up.
- Protective Gear:
- Newspaper or Drop Cloth: ABSOLUTELY ESSENTIAL! Glitter has a magical way of getting everywhere. Lay down a generous amount of newspaper or a dedicated drop cloth underneath your workspace, and even extend it to the floor around you. Trust us, your future self will thank you.
- Optional: Gloves: For those who prefer to keep their hands glitter-free during the process.
- Optional: Sealant Spray: A clear acrylic sealant spray can be applied after your glitter pumpkins are dry to minimize glitter fallout and add extra durability.
Step-by-Step: Crafting Your Dazzling DIY Rainbow Glitter Pumpkins
Get ready for a craft that’s as easy as it is dazzling! This project is perfect for adults seeking a quick decor update or for engaging toddlers and older children in a wonderfully sensory activity. They'll love rolling their pumpkins in glitter and exploring different colors.
- Prepare Your Workspace: This cannot be stressed enough – glitter *will* get everywhere! Lay down a substantial amount of newspaper or a drop cloth. Consider using a tray or cardboard box lid to contain the glitter as you work.
- Clean Your Pumpkins: If using real pumpkins, give them a quick wipe-down to remove any dirt or debris. For faux pumpkins, ensure they are clean and dry. If the faux pumpkins have easily removable stems, take them off for a smoother application.
- Apply Your Base (Optional but Recommended): For the most vibrant results, especially with neon glitter, consider painting your pumpkin a base color first.
- If you want a truly quick & easy DIY glitter pumpkin that's perfect for kids, simply paint your pumpkin a single neon color (pink, blue, green, etc.) and move to step 4 while the paint is still wet.
- For a more sophisticated look or if you're using Mod Podge as your adhesive, a coat of acrylic paint in a complementary neon shade will make your glitter pop even more. Let the paint dry completely before moving on.
- Apply the Adhesive:
- Mod Podge Method: Pour a small amount of Mod Podge onto a paper plate or a piece of cardboard. Using a brush or a fresh piece of paper towel, apply a thin, even layer of Mod Podge to a section of your pumpkin. Work in small areas so the Mod Podge doesn't dry before you apply glitter.
- Wet Paint Method: If you painted your pumpkin a base color, apply a fresh, wet coat of paint (or work immediately after your first coat if you prefer a single layer of paint). This wet paint will serve as your adhesive for the glitter. This is a fantastic option for little hands!
- Glitter Time!: This is where the magic happens.
- While the adhesive is still wet, gently sprinkle your neon rainbow glitter over the coated section of the pumpkin. You can use one color per pumpkin, or create stripes, polka dots, or a multi-colored ombre effect.
- Don't be shy, but remember "a little goes a long way" for good coverage. Rotate the pumpkin to ensure all sides are evenly covered. Don't forget the bottom!
- For a true "rainbow" effect on a single pumpkin, apply different colors of glitter in sections, or layer complementary shades.
Pro Tip: Hold your pumpkin over your newspaper-covered work surface while sprinkling, allowing excess glitter to fall directly onto the paper. You can then carefully funnel this excess glitter back into its container for future use, reducing waste.
- Dry and Admire: Once your pumpkin is completely covered in glitter, gently place it on a clean, dry section of newspaper or a drying rack. Let it sit for at least 30 minutes to dry. For thicker applications or if using Mod Podge, allowing an hour or two (or even overnight) for complete curing is best. If desired, you can apply a second coat of Mod Podge and glitter after the first layer is dry for an even more intense sparkle.
- Seal (Optional): Once fully dry, if you want to minimize glitter fallout and add an extra layer of protection, lightly spray your glitter pumpkins with a clear sealant spray (available at craft stores). Do this in a well-ventilated area.
Each sparkling gourd will be a testament to your creativity. For more inspiration on how these budget-friendly creations can transform your autumn aesthetic, explore Inexpensive DIY Glitter Pumpkins to Brighten Your Fall Decor.
Beyond Halloween: Creative Ways to Display Your Glittery Masterpieces
Once your collection of DIY rainbow glitter pumpkins is complete, the fun doesn't stop there! These versatile decorations are not limited to just Halloween. Their vibrant charm makes them perfect for a wide array of display options throughout the entire fall season and beyond:
- Chic Centerpieces: Arrange an assortment of different-sized glitter pumpkins in varying neon colors as a stunning centerpiece for your dining table or coffee table. Add a few faux fall leaves or fairy lights for extra magic.
- Shelf & Mantel Decor: Line them up on a shelf, fireplace mantel, or windowsill to add pops of unexpected color and sparkle to any room.
- Kids' Rooms & Play Areas: Let your children proudly display their own glittery creations in their bedrooms, bringing a touch of personalized whimsy to their space.
- Home Office Inspiration: Brighten up your workspace! A few neon glitter pumpkins on your desk or office shelf can provide a cheerful burst of color, boosting creativity and mood.
- Thoughtful Gifts: These handmade treasures make fantastic gifts! Imagine a teacher's face lighting up when presented with a collection of rainbow glitter pumpkins to adorn their classroom. They're also perfect for hostess gifts, coworker presents, or a little pick-me-up for a friend.
- Entryway Welcome: Place a cluster of these sparkling beauties on your entryway table or porch (if protected from elements) to greet guests with a burst of cheerful color.
- Photo Props: Their photogenic sparkle makes them ideal props for fall-themed photoshoots, baby announcements, or even just fun social media snaps.
Don't be afraid to mix and match your glitter pumpkins with more traditional fall elements. The contrast between rustic natural textures and dazzling neon sparkle creates a captivating and unique aesthetic that will draw compliments and spread joy.
Embrace the unexpected this season with your very own DIY rainbow glitter pumpkins! This simple, joyful craft proves that decorating doesn't have to be rigid or traditional. It's about personal expression, having fun, and creating beauty that sparks delight. Gather your materials, gather your loved ones, and prepare to transform ordinary pumpkins into extraordinary, shimmering works of art that will brighten your home and your spirits all season long. Let your creativity glow!
