Quick & Easy DIY Glitter Pumpkins: Perfect Halloween Craft for Kids
As the leaves begin to turn and a crispness fills the autumn air, our thoughts often drift to cozy sweaters, pumpkin spice, and, of course, Halloween! While classic orange and black decorations hold a special place in our hearts, who says we can't add a dazzling burst of color to our seasonal decor? This year, ditch the traditional and embrace a vibrant, sparkling twist with Rainbow Glitter Pumpkins: Add Neon Sparkle to Your Home Decor. This quick and easy DIY project is not only a fantastic way to involve kids in the festive preparations but also transforms ordinary pumpkins into extraordinary, shimmering showstoppers. Get ready to sprinkle some magic and create eye-catching pieces that will brighten any corner of your home!
Why Choose DIY Rainbow Glitter Pumpkins This Halloween?
Halloween has long been synonymous with specific hues: the spooky deep blacks, the ghostly whites, and the quintessential pumpkin oranges. But imagine a world where your Halloween decorations pop with electric blues, fuchsia pinks, sunny yellows, and emerald greens – all shimmering with glitter! This is the joyful reality of crafting diy rainbow glitter pumpkins. It's a delightful departure from the norm that brings a fresh, modern, and incredibly cheerful aesthetic to your fall and Halloween setup.
This craft isn't just about breaking color conventions; it's about embracing creativity and fun. For preschoolers and kids, the process of rolling pumpkins in glitter isn't just an activity; it's a sensory exploration. They learn about colors, textures, and the satisfaction of creating something beautiful with their own hands. Plus, the vibrant, neon colors are instantly appealing to young minds, making the entire experience more engaging and memorable. Whether you're decorating a child's room, adding a playful touch to your living room, or creating a whimsical porch display, these dazzling pumpkins are guaranteed to draw smiles and compliments.
Gather Your Sparkly Supplies: What You'll Need
One of the best aspects of this craft is its simplicity and affordability. Many crafters will likely find a good portion of the necessary supplies already lurking in their "overflowing craft cabinet." For those who don't, a quick trip to a local craft store or even a grocery store will suffice. You can choose between real "munchkin" pumpkins for a rustic touch or faux pumpkins for year-after-year enjoyment.
Essential Materials List:
- Pumpkins: Small real pumpkins (munchkins, gourds) or faux craft pumpkins. Real pumpkins offer natural charm, while faux ones are reusable and often easier to paint.
- Adhesive:
- For real pumpkins: Mod Podge (or a similar non-toxic craft glue).
- For faux pumpkins: Craft paint in various rainbow colors (acrylic works well).
- Glitter: An assortment of fine or chunky glitter in rainbow colors (neon shades work wonderfully for a vibrant effect!). Don't be afraid to mix and match.
- Applicators:
- For Mod Podge: Paper towels or small foam brushes.
- For paint: Paint brushes of various sizes (small brushes for details, larger ones for overall coverage).
- Protective Covering: Newspaper, old tablecloth, or a drop cloth. This craft *will* be messy, especially with glitter!
- Optional: Q-tips for polka dots, painter's tape for stripes, sealant spray (for longevity on faux pumpkins).
Choosing between real and faux pumpkins offers different experiences. Real pumpkins are biodegradable and have a unique charm, perfect for a single season's display. Faux pumpkins, on the other hand, are an excellent investment for sustainable decor, allowing you to enjoy your Inexpensive DIY Glitter Pumpkins to Brighten Your Fall Decor year after year. If using faux pumpkins, consider removing their plastic stems before painting for a cleaner finish.
Step-by-Step Guide to Crafting Your Dazzling DIY Rainbow Glitter Pumpkins
Let's get down to the sparkling details! This project is wonderfully forgiving, making it ideal for crafters of all ages and skill levels. Just remember the golden rule: glitter goes everywhere, so prepare your workspace accordingly.
1. Prepare Your Workspace
Lay down plenty of newspaper, an old tablecloth, or a drop cloth. Extend it beyond your immediate crafting area, as glitter has a magical way of traveling. You might even want to craft outdoors if the weather permits, making cleanup a breeze.
2. Apply Your Adhesive Base
This step varies slightly depending on whether you're using real or faux pumpkins:
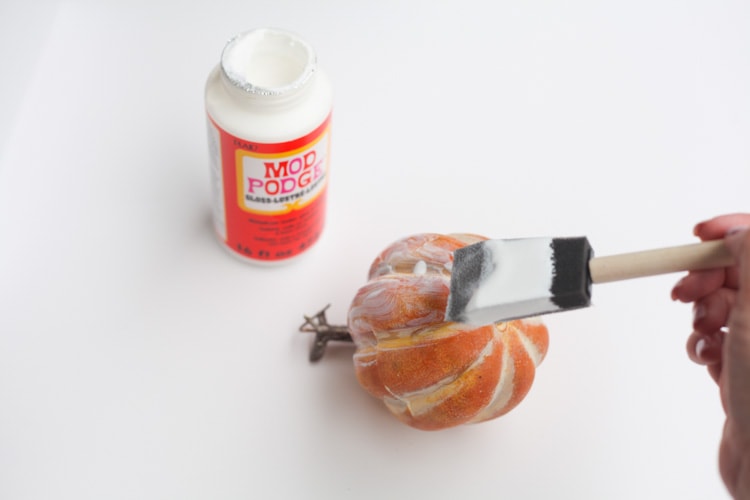
- For Real Pumpkins (Mod Podge Method): Pour a small amount of Mod Podge onto a paper towel or a disposable plate. Using the paper towel or a foam brush, spread a thin, even layer of Mod Podge over a section of your pumpkin. Work in smaller sections to prevent the Mod Podge from drying before you apply glitter.
- For Faux Pumpkins (Paint Method): Choose your desired base color. This is where the "rainbow" truly begins! Apply a thin, even coat of paint to your pumpkin using a paintbrush. You can go for a solid color, create stripes, polka dots (using Q-tips!), or even a "dipped" look. Let the paint dry completely before moving on to the glitter step (usually 15-30 minutes, depending on paint thickness). For some looks, you might apply glitter directly onto wet paint for a more embedded sparkle, but for a clean base, let it dry first.
3. The Glitter Magic!
Once your base is ready, it's glitter time! This is the most exciting part for kids (and adults!).
- Sprinkle Gently: Hold your pumpkin over your protective covering. Gently sprinkle your chosen glitter over the wet Mod Podge or recently painted surface. A little goes a long way, but don't be shy about full coverage!
- Roll and Press: If desired, you can gently roll the pumpkin in a tray of glitter for a more even and robust coating. For extra adherence, lightly press the glitter onto the surface with your fingers.
- Layering Colors: To achieve a true diy rainbow glitter pumpkins effect, work with one color at a time, or create gradient sections. You can apply different colors to different sections of the pumpkin, or even layer fine glitter over chunky glitter for added dimension.
- Don't Forget the Bottom: Ensure all visible surfaces are covered. If you plan to display the pumpkin from all angles, don't forget the underside!
4. Drying Time
Once your pumpkins are fully glittering, place them on a clean section of your newspaper or a drying rack. Allow them to dry completely for at least 30 minutes, or longer if you've applied a thick layer of Mod Podge or paint. Avoid touching them during this time to prevent smudges or glitter displacement.
Pro Tip: For faux pumpkins, once dry, you can optionally spray a clear sealant (like Mod Podge Acrylic Sealer) over the glitter to minimize shedding and protect your creation for years to come.
Decorating & Gifting: Beyond the Craft Table
The beauty of your homemade diy rainbow glitter pumpkins extends far beyond the crafting process. These vibrant, sparkling creations are incredibly versatile and can infuse joy and color into various settings:
- Home Decor Masterpieces: Arrange them in a decorative bowl on your coffee table or dining room tablescape. Place them individually on shelves, mantels, or windowsills to add unexpected pops of color. They can even liven up a home office or a kitchen counter.
- Kid-Friendly Rooms: Let your children proudly display their creations in their own rooms. It's a fantastic way to foster a sense of ownership and accomplishment.
- Thoughtful Gifts: These unique pumpkins make wonderful, handmade gifts. A school teacher would undoubtedly appreciate a cheerful glitter pumpkin to brighten their classroom during the fall season. Friends and family will love receiving such a personalized and sparkling token.
- Party Accents: Use them as centerpieces for a Halloween party or a fall gathering. Their neon glow adds a festive and playful atmosphere.
Maximizing the Fun: Tips for a Seamless Crafting Experience
To ensure your glitter pumpkin project is as fun and stress-free as possible, consider these additional tips:
- Embrace the Mess: Glitter is notorious for getting everywhere. Accept it, prepare for it, and then enjoy the sparkling aftermath. Vacuum cleaners are your friend!
- Involve All Ages: This craft is fantastic for toddlers and older kids alike. Younger children will love the sensory experience of touching the glue and sprinkling glitter, while older kids can get creative with patterns, color combinations, and even adding small embellishments. It's a great opportunity for them to learn color recognition and fine motor skills.
- Creative Variations: Don't limit yourself to solid colors! Experiment with ombre effects, stripes, polka dots, or even abstract patterns. Use different sizes of glitter (fine, chunky) or mix iridescent glitter with opaque colors for different textures and light-catching qualities.
- Consider Themes: While "rainbow" is a fantastic theme, you could also do themed sets – a series of metallic golds and silvers, or perhaps pastels for a softer fall look.
- Quick Cleanup: After you're done, gently fold up your newspaper or drop cloth, gathering the excess glitter. You can even save the excess glitter from the paper for future projects, provided you haven't mixed too many colors.
There's an undeniable joy that comes from transforming something ordinary into something extraordinary with your own hands. These diy rainbow glitter pumpkins are more than just a craft; they're a celebration of color, creativity, and the magic of the season. They're quick, inexpensive, and provide hours of fun, leaving you with dazzling decorations that will spark conversations and brighten your home.
So, gather your family, lay down that newspaper, and prepare to embark on a glittering adventure. Your home is about to get a whole lot brighter and a lot more fun this Halloween!
